Wooden Knees: Difference between revisions
(Created page with "A wooden model used to explore the structures of synovial joints, with the knee as an example. Two pieces of wood represent the femur and tibia, with the tubing standing in fo...") |
No edit summary |
||
| Line 3: | Line 3: | ||
Click to enlarge images of students building knees in a first year health science class. | Click to enlarge images of students building knees in a first year health science class. | ||
<gallery mode="nolines" widths= | <gallery mode="nolines" widths=400px heights=400px> | ||
Knee01. | Knee01.JPG| | ||
Knee02. | Knee02.JPG| | ||
Knee03. | Knee03.JPG| | ||
</gallery> | </gallery> | ||
| Line 19: | Line 19: | ||
* 8 screws | * 8 screws | ||
* 1 screwdriver | * 1 screwdriver | ||
<gallery mode="nolines" widths=200px heights=200px> | <gallery mode="nolines" widths=200px heights=200px> | ||
Knee04.jpg| | Knee04.jpg| | ||
| Line 25: | Line 24: | ||
Step 2 - Fit the cruciate ligaments | Step 2 - Fit the cruciate ligaments | ||
<gallery mode="nolines" widths=200px heights=200px> | <gallery mode="nolines" widths=200px heights=200px> | ||
Knee05.jpg| | Knee05.jpg| | ||
| Line 31: | Line 29: | ||
Step 3 - Screw the ligaments down | Step 3 - Screw the ligaments down | ||
<gallery mode="nolines" widths=200px heights=200px> | <gallery mode="nolines" widths=200px heights=200px> | ||
Knee06.jpg| | Knee06.jpg| | ||
| Line 39: | Line 36: | ||
Step 5 - Add the collateral ligaments | Step 5 - Add the collateral ligaments | ||
<gallery mode="nolines" widths=200px heights=200px> | <gallery mode="nolines" widths=200px heights=200px> | ||
Knee07.jpg| | Knee07.jpg| | ||
| Line 45: | Line 41: | ||
== Production Information == | == Production Information == | ||
* Vinyl tubing - 9mm outer diameter, approx. 200mm long pieces (x4 per set) | * Vinyl tubing - 9mm outer diameter, approx. 200mm long pieces (x4 per set) | ||
* Screws - 25mm long (x8 per set) | * Screws - 25mm long (x8 per set) | ||
| Line 55: | Line 50: | ||
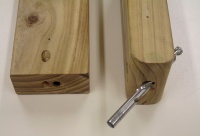
Using a 10mm drill bit (i.e. wider than the tubing) drill the holes to accommodate the cruciate ligament tubing - just on either side of the middle of the articular faces and at an angle of 45 degrees. A drill press is essential for safety and to keep all parts uniform and interchangeable during class use. Rotate the lower part of the drill press to 45 degrees and make up a jig to hold the work. Make sure that all work is securely held with clamps and ensure that the drill does not penetrate further than is safe. | Using a 10mm drill bit (i.e. wider than the tubing) drill the holes to accommodate the cruciate ligament tubing - just on either side of the middle of the articular faces and at an angle of 45 degrees. A drill press is essential for safety and to keep all parts uniform and interchangeable during class use. Rotate the lower part of the drill press to 45 degrees and make up a jig to hold the work. Make sure that all work is securely held with clamps and ensure that the drill does not penetrate further than is safe. | ||
Click on the image to enlarge. | Click on the image to enlarge. | ||
<gallery mode="nolines" widths=200px heights=200px> | <gallery mode="nolines" widths=200px heights=200px> | ||
| Line 68: | Line 62: | ||
Once the wooden pieces are satisfactorily shaped and drilled, they should be sanded well and varnished. | Once the wooden pieces are satisfactorily shaped and drilled, they should be sanded well and varnished. | ||
Latest revision as of 01:15, 23 September 2016
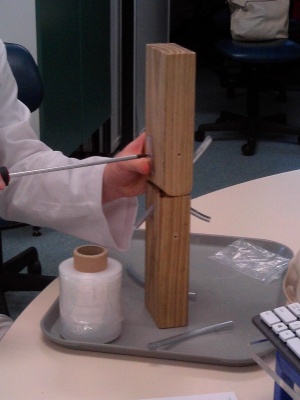
A wooden model used to explore the structures of synovial joints, with the knee as an example. Two pieces of wood represent the femur and tibia, with the tubing standing in for cruciate and collateral ligaments and the stretch wrap representing the joint capsule.
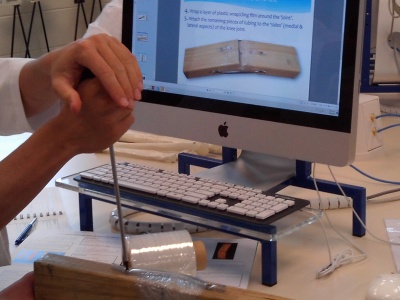
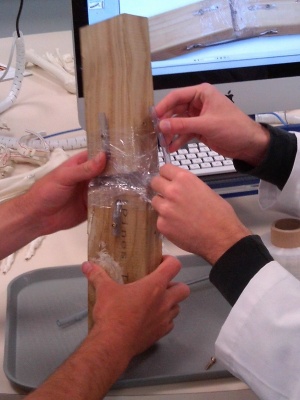
Click to enlarge images of students building knees in a first year health science class.
Student Class Exercise
Click on any image to enlarge.
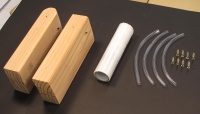
Step 1 - make sure students have all the materials:
- 1 piece of timber with squared off ends
- 1 piece of timber with one rounded end
- 1 roll of stretch wrap
- 4 pieces of tubing (with pre-punched guide holes)
- 8 screws
- 1 screwdriver
Step 2 - Fit the cruciate ligaments
Step 3 - Screw the ligaments down
Step 4 - Create joint capsule by wrapping the joint with stretch wrap
Step 5 - Add the collateral ligaments
Production Information
- Vinyl tubing - 9mm outer diameter, approx. 200mm long pieces (x4 per set)
- Screws - 25mm long (x8 per set)
- Screwdriver to match screw heads (x1 per set)
- Stretch wrap e.g. 20um thick, 100mm wide roll (x1 per set)
- Pine timber - clean sawn, 90mm x 45mm (or near equivalent)
- Femur - 200mm long with one end shaped into a curve - see photo (x1 per set)
- Tibia - 200mm long (x1 per set)
Using a 10mm drill bit (i.e. wider than the tubing) drill the holes to accommodate the cruciate ligament tubing - just on either side of the middle of the articular faces and at an angle of 45 degrees. A drill press is essential for safety and to keep all parts uniform and interchangeable during class use. Rotate the lower part of the drill press to 45 degrees and make up a jig to hold the work. Make sure that all work is securely held with clamps and ensure that the drill does not penetrate further than is safe. Click on the image to enlarge.
Using a smaller drill bit (diameter to suit the screws) drill guide holes for the cruciate screws - mid-line and about 25mm further away than the large holes. Again, use a jig and a drill press (with the lower part returned to horizontal).
Test the tubing in the cruciate holes and mark where the screw holes should be on the tubing. Multiple tubing pieces can be cut to be 25mm longer at either end and can be pre-punched for the screws.
To mark where the collateral ligament will be screwed down use the tubing holes as a template. Use a jig and a drill press to drill these guide holes in the same position on both sides of the Tibia and Femur.
Once the wooden pieces are satisfactorily shaped and drilled, they should be sanded well and varnished.
Creators: Rachel Lissaman (academic support), Fieke Neuman (design), Alex Witherow (preparation of wooden elements). All from Department of Anatomy, University of Otago.
Keywords: Teaching, Anatomy, Joints, Science, Biology
This work is licensed under a Creative Commons Attribution-NonCommercial-ShareAlike 4.0 International License

